
Hello and welcome to our downloads page.
Now Available For Download:
1) - Proven DNF Custom Feeding Program - includes additives for use.
Our custom DNF feeding program has been 7 - 8 years in te making. We have come up with a stand out feeding program that is sure to impress the novice and even the seasoned growers alike. Examples of additives that work well in conjunction with MMAD HYDROPONICS Custom DNF feeding program are as follows: SuperThrive, "Green gold" Xplode, Calcium & Magnesium, Humic & Fulvic Acids, Nute Shots "seaweed based additives", & a wide range of Bloom products "Bloom product with adequate NPK ratios".
"Stop in at MMAD HYDROPONICS and let us tweak that recipe even further just for you"
Important Notes: Most general fertilizers are usually not formulated for growing hydroponic crops on their own.
Base nutrients are just that "base nutrients" Bast nutrients such as, but "not limited to" DNF A&B products on their own do contain NPK & trace elements, but not in the proper ratios.
NPK ratios "for the most part" are usually adequate and micro nutrients are present, but when used for hydroponic growing missing links such as Calcium, Magnesium & sulphur must be added to, or used in conjunction with nutrients such as DNF A & B products as they are vital for full vibrant healthy growth.
The quality of your nutrients strongly determine the outcome of your end results, and remember its not how much you pay for your nutrients, its the right ratios of the missing links that will determine your success.
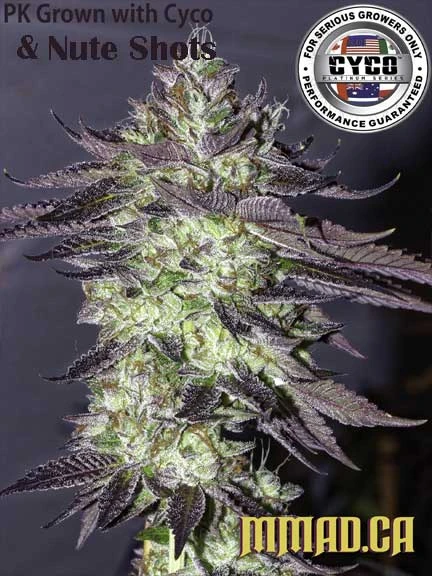
Pic of bud grown using the MMAD custom DNF recipe! VISIT MMAD Hydroponics to learn how to tweak this recipe to your advantage! Let us help you put the rest of the puzzle together for great results.... REMEMBER: If your missing one piece of the puzzle, it will never look it's best! |
 |
*** |
MMAD HYDROPONICS CUSTOM RECIPE FOR DNF |
*** |
MMAD HYDROPONICS PROVEN DNF RECIPE:
Use for high quality end product and huge yields.
VEGATATIVE STAGE - Grow A - B "This chart is specific to DIRT grow"
Date |
Stage |
DNF GROW |
DNF GROW |
Additives 1 |
Additives 2 |
LIGHTS |
ph |
WEEK 1 |
SEEDLINGS |
25ml x 20 L GROW "A" |
25ml x 20 L GROW "B" |
Concentrated |
Calimag / FloraN |
18 hrs ON |
5.5 / 5.7 |
WEEK 2 |
VEG |
50ml x 20 L GROW "A" |
50ml x 20 L GROW "B" |
Concentrated |
Calimag / FloraN per directions |
18 hrs ON |
5.5 / 5.7 |
WEEK 3 |
VEG |
65ml x 20 L GROW "A" |
65ml x 20 L GROW "B" |
Concentrated |
Calimag / FloraN per directions |
18 hrs ON |
5.5 / 5.7 |
WEEK 4 |
VEG |
75ml x 20 L GROW "A" |
75ml x 20 L GROW "B" |
Concentrated |
Calimag / FloraN per directions |
18 hrs ON |
5.5 / 5.7 |
BLOOM STAGE - Bloom A - B "This chart is specific to DIRT grow" NOTE: Additional additive required!
Date |
Stage |
DNF BLOOM "A" |
DNF BLOOM "B" |
Additives 1 "example" |
Additives 2 "example" |
LIGHTS |
ph |
|
WEEK 1 |
BLOOM |
70 ml X 20 L BLOOM "A" |
70 ml X 20 L BLOOM "B" |
Seaweed Extract
& strat using Terpinator |
Calimag / FloraN per directions |
12 hrs ON 12 hrs OFF |
6.3 / 6.5 |
|
WEEK 2 |
BLOOM |
80 - 85 ml X 20 L BLOOM "A" |
80 - 85 ml X 20 L BLOOM "B" |
Seaweed Extract
Terpinator |
Calimag / FloraN per directions |
12 hrs ON 12 hrs OFF |
6.3 / 6.5 |
|
WEEK 3 |
BLOOM |
90 - 95 ml X 20 L BLOOM "A" |
90 - 95 ml X 20 L BLOOM "B" |
Seaweed Extract
Terpinator |
Calimag / FloraN per directions |
12 hrs ON 12 hrs OFF |
6.3 / 6.5 |
|
WEEK 4 |
BLOOM |
105 - 110ml X 20 L BLOOM "A" |
105 - 110ml X 20 L BLOOM "B" |
Discontinue Seaweed Terpinator |
Start Introduce 0-53-33 Bloom At 21 days and continue /calmag & FN |
12 hrs ON 12 hrs OFF |
6.3 / 6.5 |
|
WEEK 5 |
BLOOM |
105 - 115ml X 20 L Bloom "A" |
105 - 115ml X 20 L BLOOM "B" |
Terpinator |
Calimag / FloraN 0-53-33 Bloom |
12 hrs ON 12 hrs OFF |
6.3 / 6.5 |
|
WEEK 6 |
BLOOM |
105 - 115ml X 20 L BLOOM A |
105 - 115ml X 20 L BLOOM "B" |
Terpinator |
Calimag / FloraN 0-53-33 Bloom |
12 hrs ON 12 hrs OFF |
6.3 / 6.5 |
|
|
WEEK 7 |
FLUSH last 14 days |
FLUSH last 14 days |
FLUSH last 14 days |
FLUSH last 14 days |
FLUSH last 14 days |
12 hrs ON 12 hrs OFF |
6.3 / 6.5 |
|
WEEK 8 |
FLUSH last 14 days |
FLUSH last 14 days |
FLUSH last 14 days |
FLUSH last 14 days |
FLUSH last 14 days |
12 hrs ON 12 hrs OFF |
6.3 / 6.5 |
|
MMAD TIPS: WHEN THE MICROSCOPE TELLS YOU IT'S READY TO HARVEST SHUT OFF LIGHTS AND LET PRODUCT RIPEN FOR 24 - 36 or 48 HRS WITH LIGHTS OFF MMAD TIPS: - Between every feeding there MUST be a watering of plants with ph water! Feed once / Water once, etc, etc |
||||||||
Download DNF Recipe - Click Here Visit us for more tweaks to this recipe! - Including (HST) High Stress Traning. - |
2) - Grow Room Lighting Setup:
Basic rules for lighting: A 1000 watt will "could" cover a 10' by 10' Grow area, 8' x 8' would be more adequate if it had proper ventilation. With a 600 watt grow light, it will cover about 5' by 5' "or so" and a 400 watt will cover about 3' by 3' "or so", at max a 4' by 4' room could stand a 1000 watt bulb "depends on many factors" .
IF using a 1000 watt bulb in an area of 10 feet by 10 feet, it could be skimping a little, however it could be very wasteful "shy on adequate lighting" considering the plants on the outside will get very little light, however, tricks could be implemented to achieve less waste, rotating the plants on a daily basis could help reduce this skimping, place your plants on movable trays "trays on wheels", and spin them regularly, shuffle plants that are closer to the light with plants farther away from the light, etc...
Hint: If going by the above scenario, if your grow pots were situated on mobile turn-tables "small homemade dolly" you could shift them around without too much effort, this in itself could significantly enhance your yield. "Many practice this with great results!"
It is actually better to use two 600's or 4 400's you can place them closer and get more for your money, however if you do choose to put a 1000 watt in a 4 by 4 space then you better have some serious ventilation because it will produce a lot of heat during light cycles.
From my personal experience a 1000 watt fixture could also be good for a 4' x 4' area. This is a general rule of thumb based on horticultural growth rate requirements of about 50 watts per square foot... Note: adequate ventilation is required!
4' x 4' at 50 watts "good recommendation" per square foot would require 800 watts. 1000 watts would be optimal and would guarantee proper light penetration up to 4' x 4'.
However, larger areas CAN be used with success. When growing indoors one important key is to have all your grow lights properly situated "equally apart" and use the PROPER reflector's, this ensures you're using all the light the bulb/s are producing within that given space and none is being wasted. Any light that "leaks" out is unused light and the efficiency of your bulb and setup immediately begins to diminish..
Now, going by the above recommendations, will greatly increase the necessity for proper ventilation. But luckily with all the air circulation products on the market today, this can easily be archived, not to mention air cooled reflectors and cool-tubes available out there, the ventilation possibilities are endless.
The most important aspect of ventilating small grow spaces is creating a negative pressure environment. This is done by having an exhaust that's larger than the intake "this can be archived in many different ways, for example; You could use 2 exact same fans and have one on a variable speed control to reduce its CFM!".
Setting this up properly ensures all the air is being circulated and replaced which will dramatically help with cooling and air flow of confined "closed in" spaces.
The more light you can push through your grow room, the better. Exercise those tactics in your 4x4 room; you might be surprised at the outcome.......
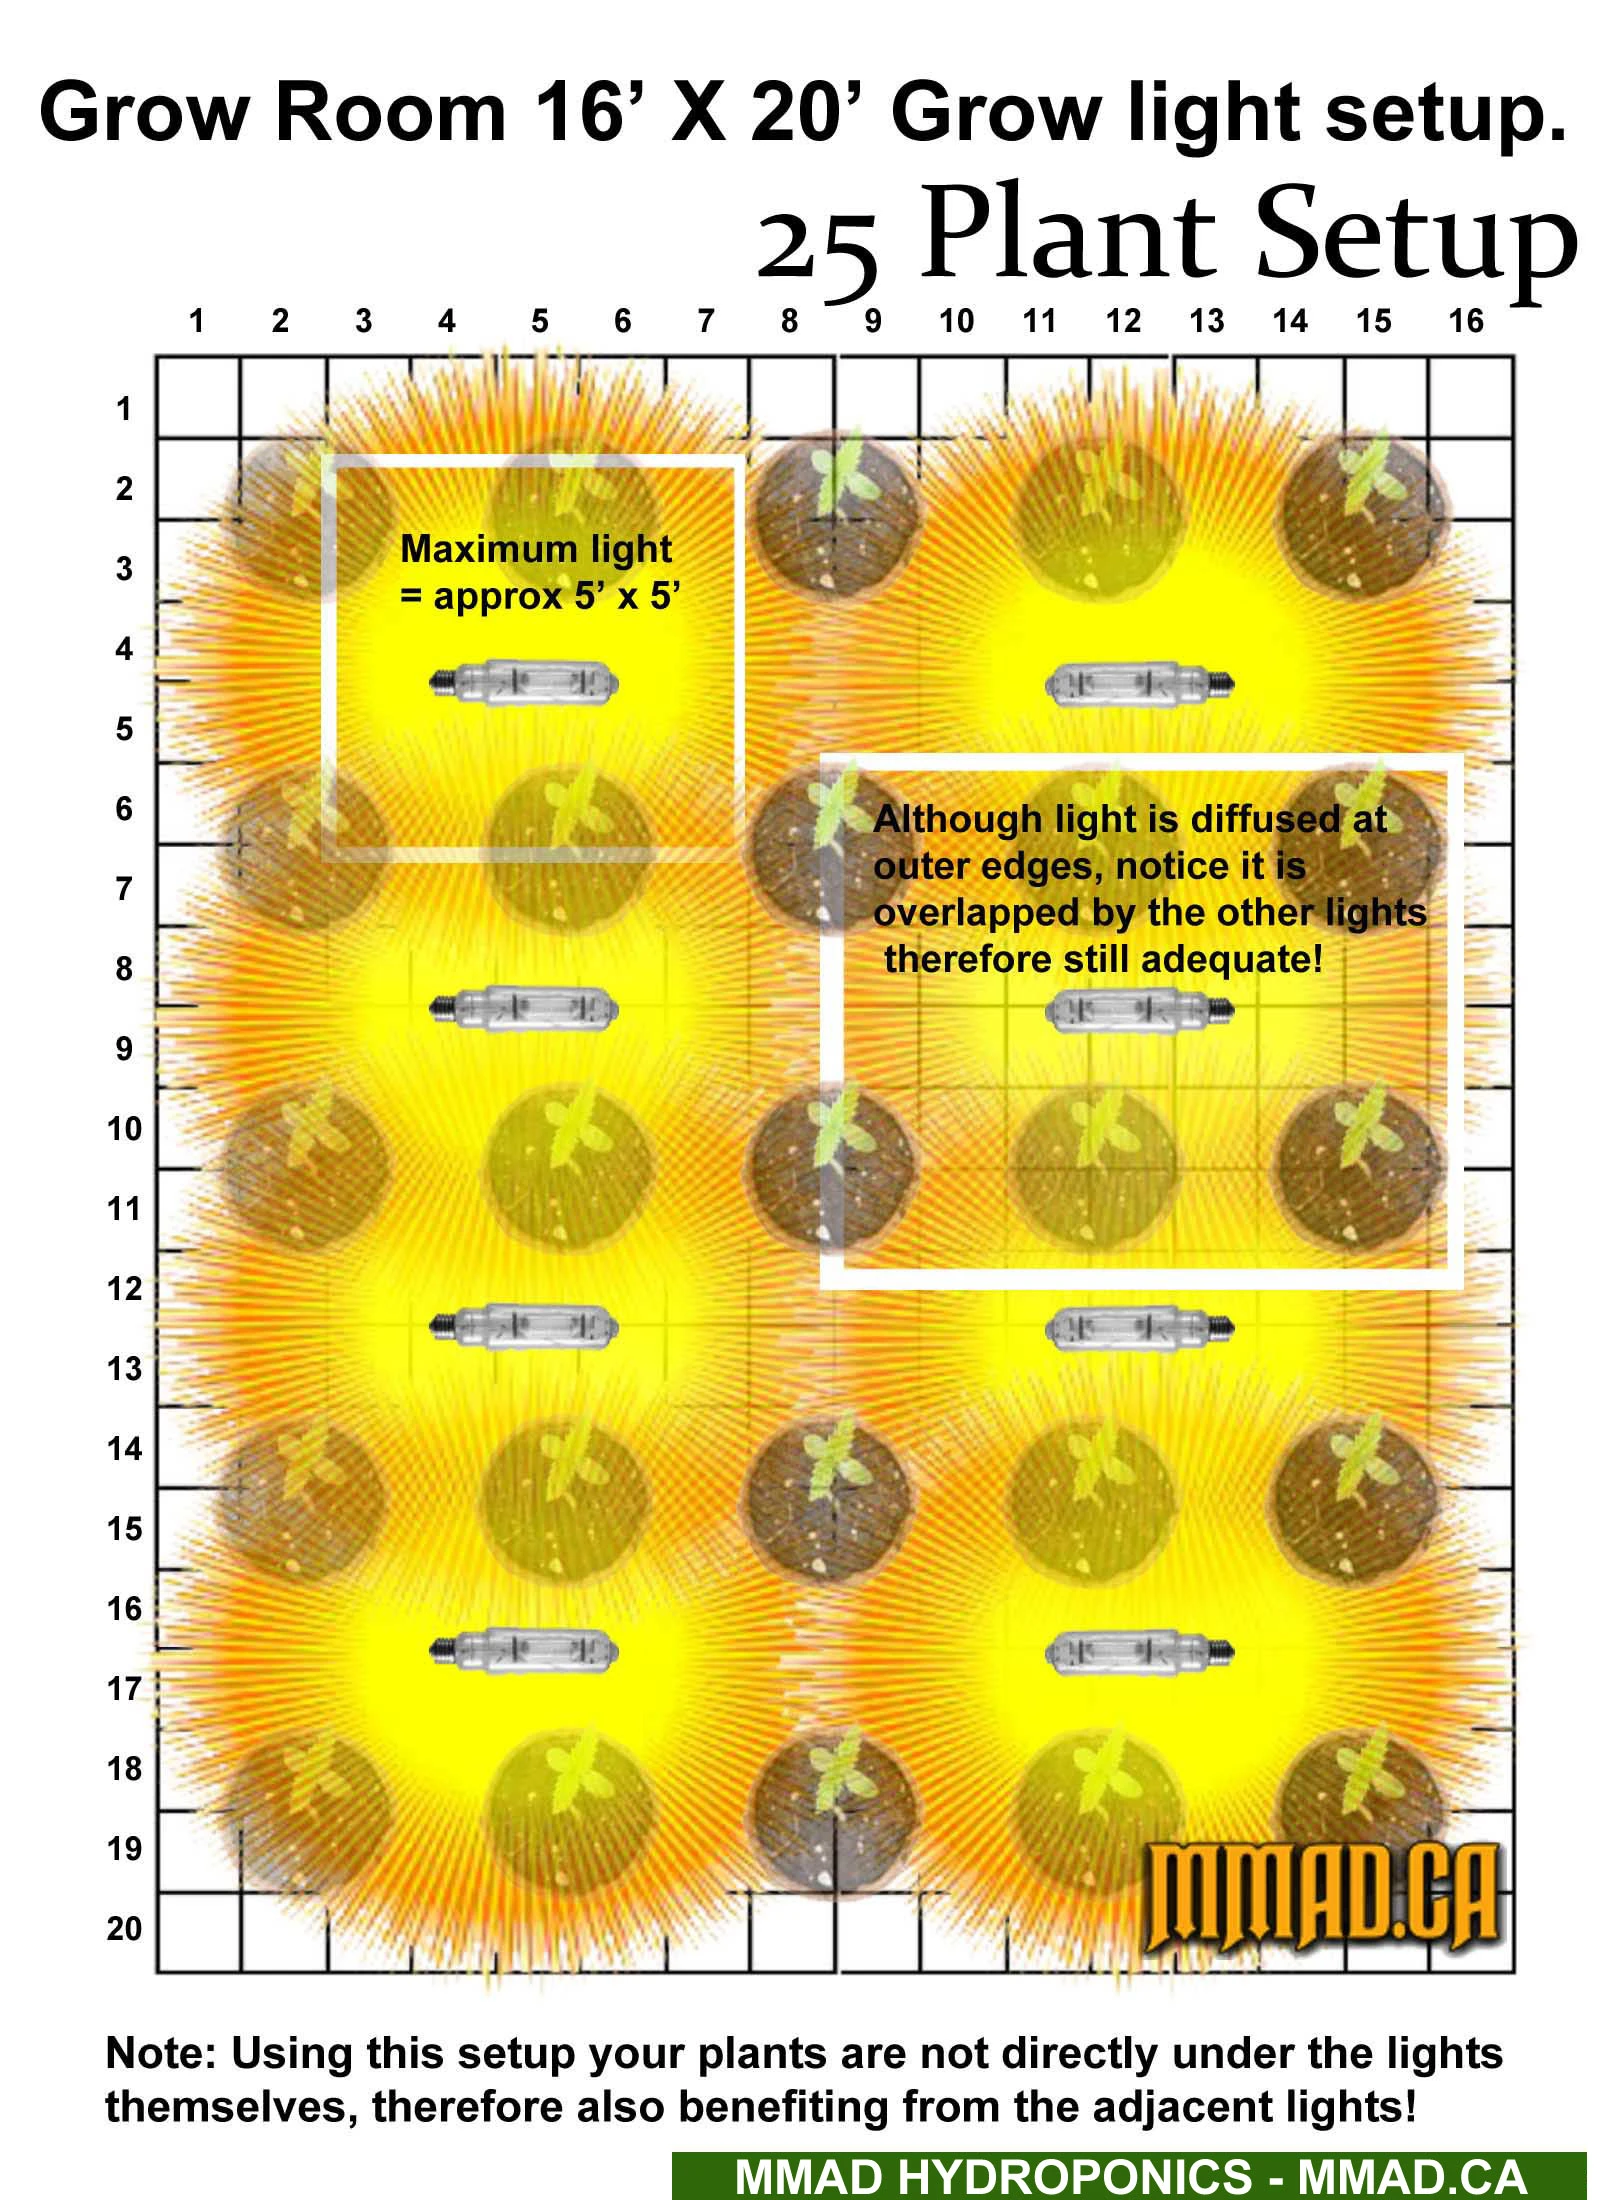
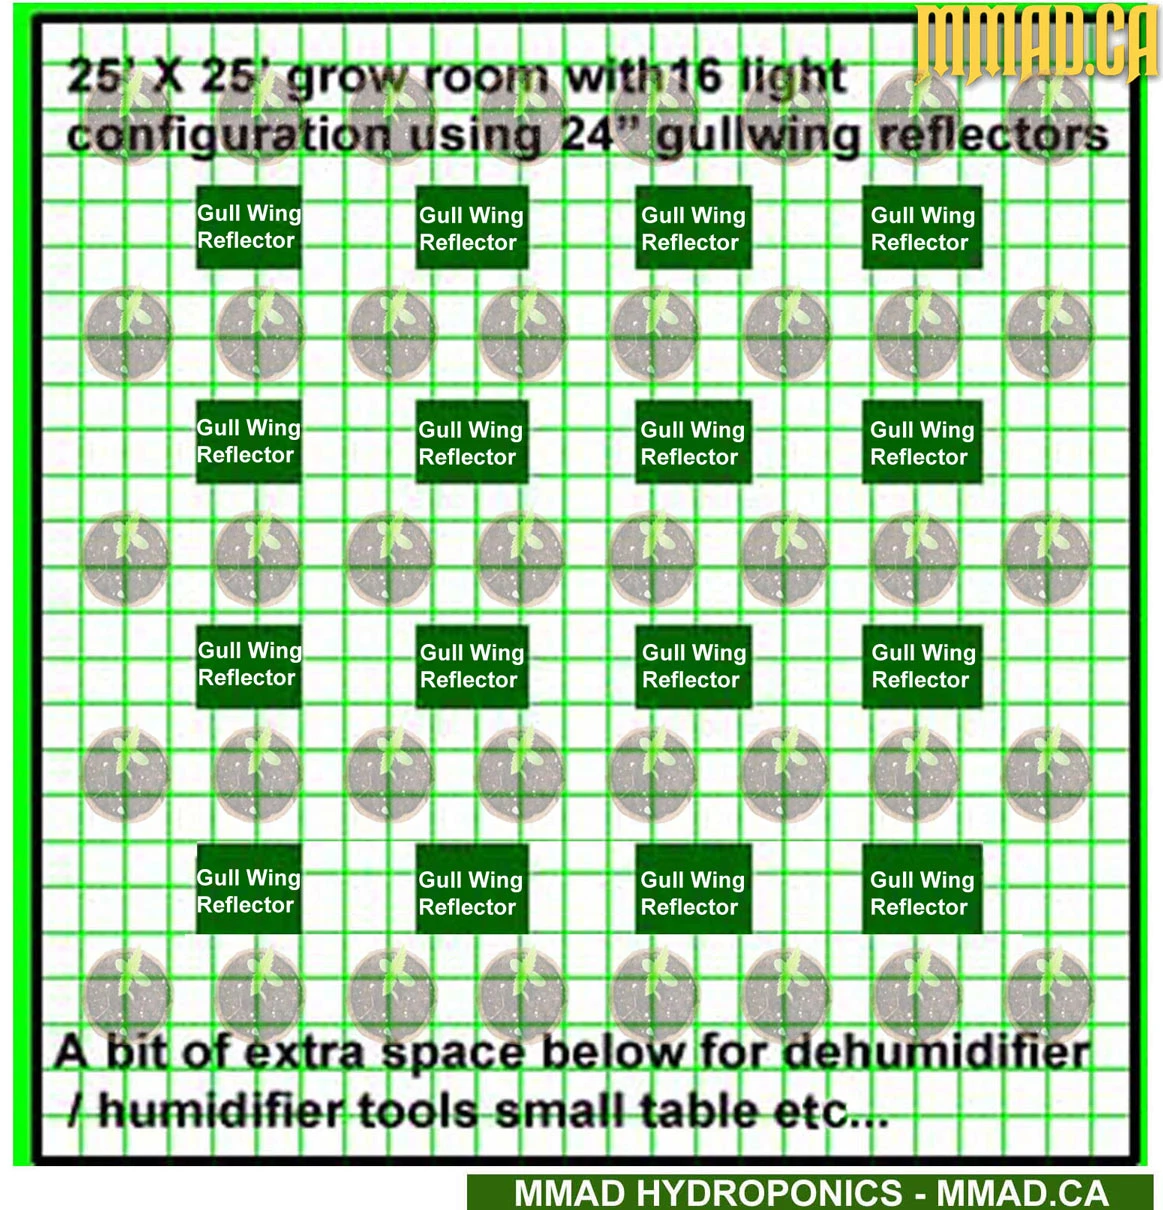
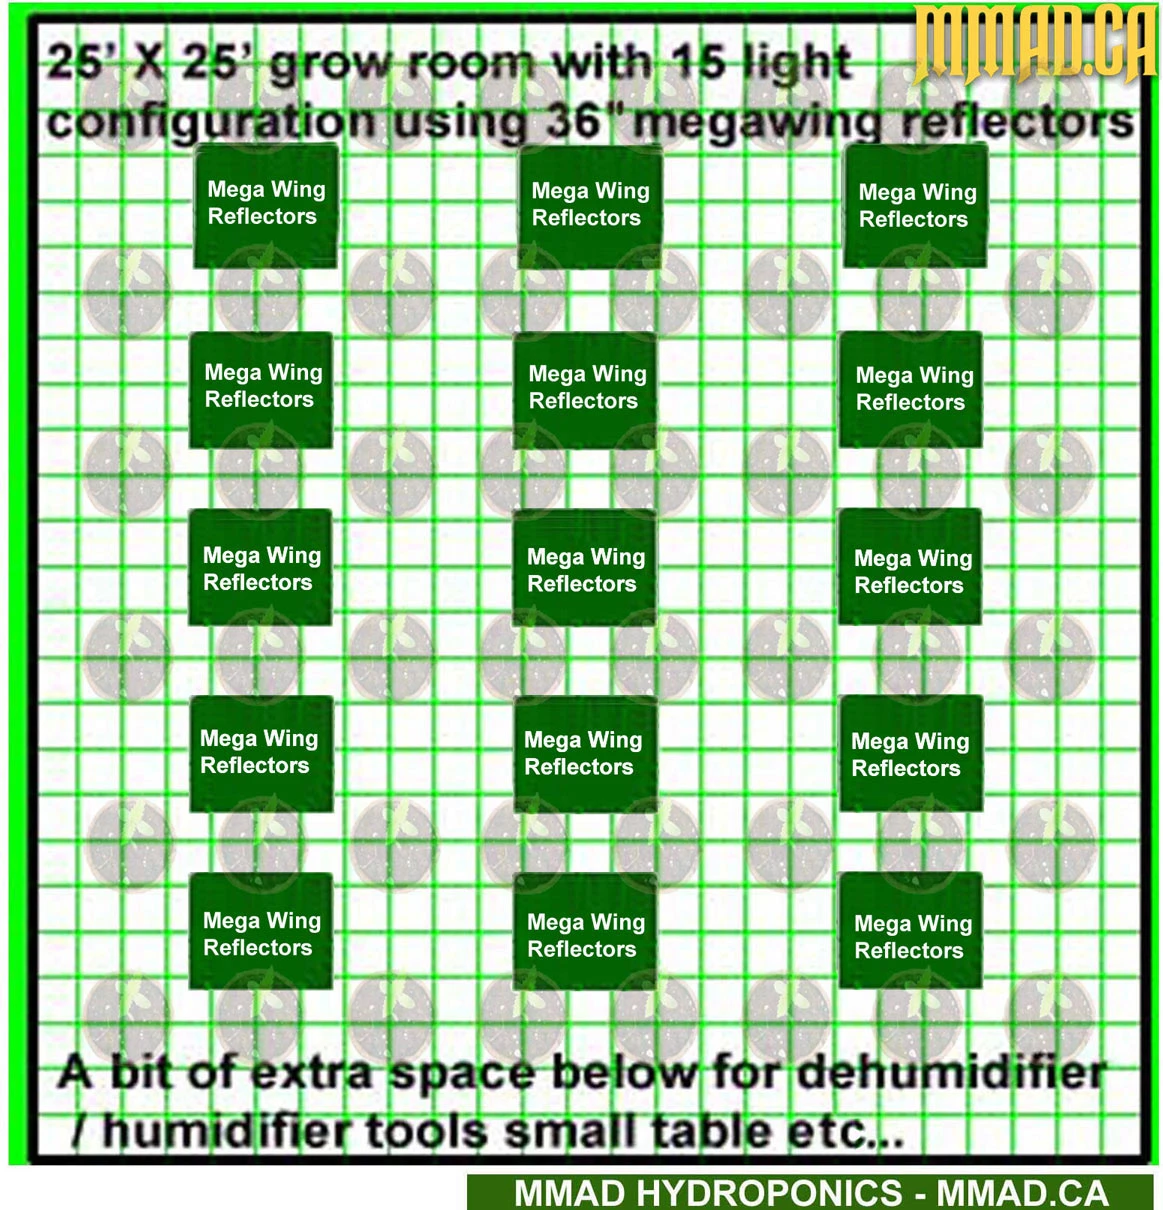
Example "see images below" of Grow Room lighting configurations in different size rooms, examples are shown in a room that is 16' x 20' long in addition to options for a grow room that is 25' X 25' long.
The first example setup below is for a 16' x 20' room setup that works great with 8 hps "or MH" lights and a 25 pot configuration of 15 to 20 gal pots. These example setups are for demonstration purposes only. In the following example images, we only show the actual lighting / positioning setup; "Exhaust fans, intake fans, oscillating fans, flushing table / setups etc..., are not shown in these lighting scenarios."
Note: Using the possible lighting setups shown below, your plants are not situated directly under the lights themselves, therefore also benefiting from the adjacent lights!
Download Lighting Floor Plan and Graph "16' x 20' room" - Click Here |
-----------------------------------------------------------------------------------
Grow Room Lighting Setup ideas: Below you will find 3 examples of working grow room lighting setups. Setup ideas from a 16' x 25' room to 25' x 25' room lighting setup.
Download the above printable grow light floor plan & graph ".doc" |
| Below: 2 Examples for a 25' X 25' grow room "using different reflectors", and different light configurations, both work very well. |
Hint: If going by the lighting scenario's shown here, on this page, if your grow pots were situated on mobile turn-tables "small homemade dolly" you could shift them around without too much effort, this in itself could significantly enhance your yields. "Many practice this with great results!" |
| 1) Below image: Example 1 Features a 25' X 25' Grow Room with a 16 light configuration using 24" Gull Wing Reflectors & 15 to 20 gal pots. |
| 2) Below image: Example 2 Features a 25' X 25' Grow Room with a 15 light configuration using 36" Megal Wing Reflectors & 15 to 20 gal pots. |
When setting up your grow room using the above scenarios show here, ensure your plants have matured through their GROW "VEGATATIVE" STAGE, flip when plants reach 27" to 29".
MATURE PLANTS HELP ENSURE BETTER END PRODUCT QUALITY AND HIGHER YEILD! "if everything else is done right"
Many factures play a significant part in this equation, adequate lighting for seedlings, grow room HID lighting, bulbs / spectrum range, nutrients & additives, air quality & circulation, climate control, flush, cure, etc... Etc... Etc...
If you’re not sure about anything stop in and see us at MMAD HYDROPONICS and let us help you grow.